SignTorch
Artist
This is shown for DEMONSTRATION ONLY.
Before this can be used for production it needs a fail-safe mechanism because the touch probe may fail to detect through rust, oil, paint, etc, or if the material does not make good contact with ground. Fail-safe can be accomplished with stall-detection, or a floating Z axis, or a break-away torch holder.
It also needs an amplifier to improve detection, and surge protection, and more isolation from the BOB.
This just demonstrates the basic connection and principle. The amplifier and fail-safe will be covered separately.
The light rust on the sheet metal in the photos below has several mega-ohms of resistance so the probe has a hard time detecting contact, because the pull-up resistor holds the pin high, and the probe has to break through the rust and make contact with ground, with less resistance than the pull-up resistor, to ever detect contact.
You should try this only if you have clean metal material with good ground contact through the table.
Basic height control means having automated initial height sensing so the torch height can be set automatically before each cut sequence.
That is accomplished by having a height calibrated conductive probe on the torch to touch the metal material.
Some Hypertherm torches have an ohmic cap and shield available as shown.
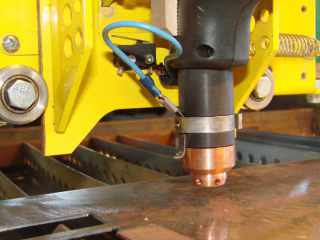
Or you can build a cap or contact of some sort to attach to the torch that extends slightly below the nozzle so that it contacts the material before the nozzle. Here's one made from a copper pipe reducer.
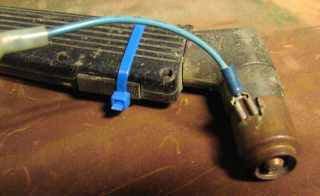
It must be something that is conductive yet electrically isolated from the torch nozzle.
I call it a probe but it is often referred to as initial height sensor (IHS).
It is wired through the torch relay, so that the probe is disconnected when the torch is firing.
Earlier, we connected the torch trigger through the Pin 1 relay on the BOB, and an optional external 12 V DPDT relay was shown. That external torch relay is now required. One pole (normally open) is used to trigger the torch. The other pole (normally closed) is used to disconnect the probe wire when the torch relay is on.
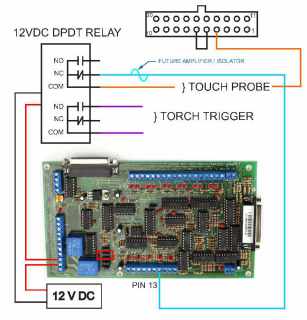
Install the jumper on the BOB for pin 13 pull-up resistor. If you use the existing probe wire in the connector as shown, on the other end of that wire, where it comes out of the carriage motor cap, there is an inline resistor on that wire which must be removed.
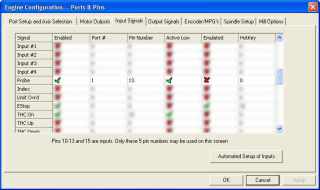
In Mach3 Config Ports and Pins on the Inputs tab set the probe input as shown
The pin 13 light on the BOB should be on, and it should go off if you connect a test jumper from the probe to the table or material. In Mach3, on the Diagnostics screen, the Digitize LED should come on with test jumper from probe to ground.
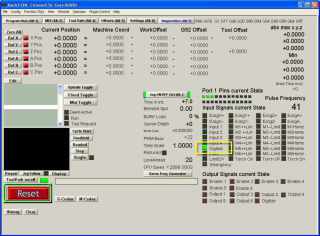
Now, to automatically set the torch height in gcode we issue commands similar to the following right before moving to pierce height
G31 Z-2 F20
G92 Z0
That initiates a downward probe operation moving 2 inches at 20 units per minute.
The operation stops when the probe contacts ground and then Z is set to zero.
Then the program can continue normally (to pierce height) and Z will be zeroed to the top of the material at that point.
In Sheetcam, in machine options, you can use the post processor named THC300-G31 to output similar gcode that should work ok for now.
WARNING: again, this is for demonstration only and probing should only be tried on clean metal material with good ground contact. Since we don't have any fail-safe, if the probe does not detect ground for any reason then it will drive the Z axis down with full force which could smash the torch into the table or material.
Next, we need to come up with a viable fail-safe mechanism and optionally, a signal amplifier that can more reliably detect through rust, mill scale, oil, etc...
Before this can be used for production it needs a fail-safe mechanism because the touch probe may fail to detect through rust, oil, paint, etc, or if the material does not make good contact with ground. Fail-safe can be accomplished with stall-detection, or a floating Z axis, or a break-away torch holder.
It also needs an amplifier to improve detection, and surge protection, and more isolation from the BOB.
This just demonstrates the basic connection and principle. The amplifier and fail-safe will be covered separately.
The light rust on the sheet metal in the photos below has several mega-ohms of resistance so the probe has a hard time detecting contact, because the pull-up resistor holds the pin high, and the probe has to break through the rust and make contact with ground, with less resistance than the pull-up resistor, to ever detect contact.
You should try this only if you have clean metal material with good ground contact through the table.
Basic height control means having automated initial height sensing so the torch height can be set automatically before each cut sequence.
That is accomplished by having a height calibrated conductive probe on the torch to touch the metal material.
Some Hypertherm torches have an ohmic cap and shield available as shown.

Or you can build a cap or contact of some sort to attach to the torch that extends slightly below the nozzle so that it contacts the material before the nozzle. Here's one made from a copper pipe reducer.

It must be something that is conductive yet electrically isolated from the torch nozzle.
I call it a probe but it is often referred to as initial height sensor (IHS).
It is wired through the torch relay, so that the probe is disconnected when the torch is firing.
Earlier, we connected the torch trigger through the Pin 1 relay on the BOB, and an optional external 12 V DPDT relay was shown. That external torch relay is now required. One pole (normally open) is used to trigger the torch. The other pole (normally closed) is used to disconnect the probe wire when the torch relay is on.

Install the jumper on the BOB for pin 13 pull-up resistor. If you use the existing probe wire in the connector as shown, on the other end of that wire, where it comes out of the carriage motor cap, there is an inline resistor on that wire which must be removed.
In Mach3 Config Ports and Pins on the Inputs tab set the probe input as shown

The pin 13 light on the BOB should be on, and it should go off if you connect a test jumper from the probe to the table or material. In Mach3, on the Diagnostics screen, the Digitize LED should come on with test jumper from probe to ground.

Now, to automatically set the torch height in gcode we issue commands similar to the following right before moving to pierce height
G31 Z-2 F20
G92 Z0
That initiates a downward probe operation moving 2 inches at 20 units per minute.
The operation stops when the probe contacts ground and then Z is set to zero.
Then the program can continue normally (to pierce height) and Z will be zeroed to the top of the material at that point.
In Sheetcam, in machine options, you can use the post processor named THC300-G31 to output similar gcode that should work ok for now.
WARNING: again, this is for demonstration only and probing should only be tried on clean metal material with good ground contact. Since we don't have any fail-safe, if the probe does not detect ground for any reason then it will drive the Z axis down with full force which could smash the torch into the table or material.
Next, we need to come up with a viable fail-safe mechanism and optionally, a signal amplifier that can more reliably detect through rust, mill scale, oil, etc...
